If you’re after a snack that’s crisp, buttery, and gone within minutes of hitting the table, Mary Berry cheese straws are exactly what you need. They’re one of those bakes that look fancy enough for a party but are simple enough for a weekday treat. Made with just a handful of pantry staples, these cheesy little strips deliver a satisfying crunch with every bite.
In this guide, I’ll walk you through everything you need to know from the ingredients and tools to step-by-step instructions, common mistakes, healthier swaps, and storage tips. Whether you’re baking for a festive gathering or just craving something savoury, this recipe has you covered.
What Are Mary Berry Cheese Straws?
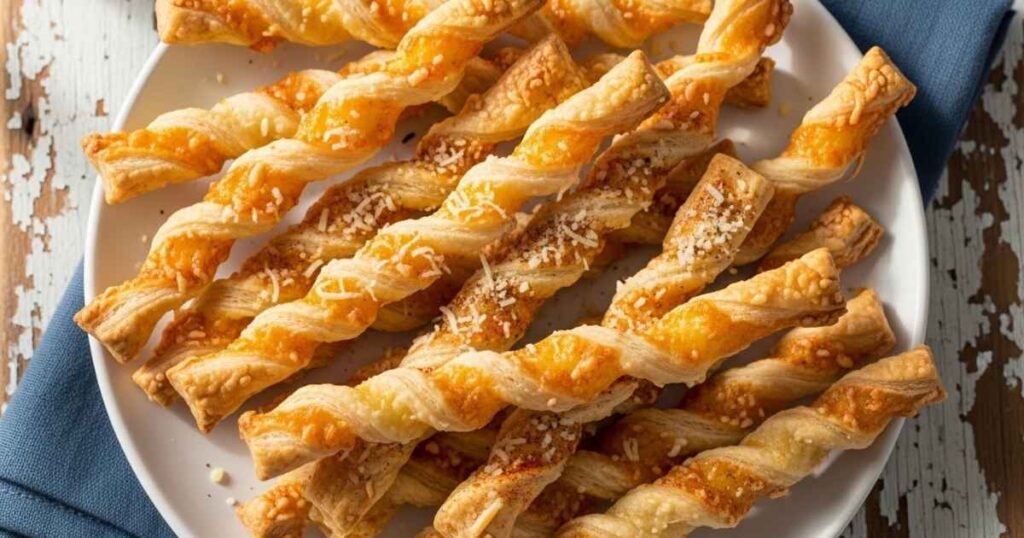
Cheese straws are thin, crisp strips of pastry flavoured with grated cheese and a touch of seasoning. Mary Berry’s version is loved for its simplicity a buttery base packed with sharp cheddar (and sometimes a hint of Parmesan or mustard powder) that bakes up golden, flaky, and full of flavour.
Some versions use a shortcrust-style pastry made from scratch with flour, butter, and cheese rubbed together, while others rely on ready-rolled puff pastry for a quicker route to the same crispy result. Either way, the goal is the same: a light, buttery bite with a punchy cheesy finish.
These little bakes have been a staple on British party tables for decades, often served alongside drinks, dips, or as part of a festive spread. They’re easy to make ahead, freezer-friendly, and endlessly customizable which is exactly why they’ve stayed popular for so long.
Why This Recipe Is Worth Trying
Related post: Mary Berry Shortcrust Pastry Recipe
There are plenty of cheese straw recipes out there, but Mary Berry’s version stands out for a few solid reasons:
- Beginner-friendly: No fancy techniques or equipment required.
- Quick turnaround: Most batches are oven-ready in well under an hour.
- Minimal ingredients: You likely have most of what you need already.
- Versatile: Works with shortcrust or puff pastry, and welcomes flavour tweaks.
- Crowd-pleaser: Crisp, cheesy bites that disappear fast at parties.
- Make-ahead friendly: Bakes well in advance and freezes beautifully.
If you’ve ever ended up with cheese straws that were soggy, bland, or fell apart before they even reached the oven, this recipe done right fixes all of that.
Essential Ingredients to Make Mary Berry Cheese Straws
Here’s what you’ll typically need for a classic batch of cheese straws:
| Ingredient | Quantity (approx.) | Purpose |
| Plain flour | 175g | Base of the pastry |
| Cold butter | 75g | Adds richness and flakiness |
| Mature Cheddar cheese, grated | 75-100g | Main flavour component |
| Mustard powder | ½ tsp | Adds a subtle savoury kick |
| Cayenne pepper or paprika | A pinch | Adds gentle warmth |
| Egg (beaten) | 1 | Binds the dough and adds shine |
| Salt and black pepper | To taste | Seasoning |
| Extra cheese for topping | A small handful | For that golden, cheesy crust |
If you prefer the puff pastry shortcut version, simply swap the homemade dough for a sheet of ready-rolled, all-butter puff pastry, then layer it with grated cheese, seasoning, and an egg wash before folding and cutting into strips.
Handy Kitchen Tools for Best Results
You don’t need a fully stocked kitchen to make these, but a few basic tools make the process smoother:
- Mixing bowl – for rubbing the butter into the flour
- Box grater – fine grating gives a smoother, more even dough
- Rolling pin – to roll the pastry to an even thickness
- Sharp knife or pizza cutter – for clean, even strips
- Baking trays – at least two, so you can bake in batches
- Baking parchment – prevents sticking and makes cleanup easy
- Pastry brush – for the egg wash
- Wire rack – essential for cooling and crisping up the straws
A fluted pastry cutter is optional but gives your straws a neat, bakery-style edge if you want that extra polish.
Step-by-Step Guide to Making Mary Berry Cheese Straws
Follow these steps for a batch of crisp, golden cheese straws every time.
Step 1: Prepare the Oven and Tray
Preheat your oven to 200°C (180°C fan / Gas Mark 6). Line two baking trays with baking parchment so the straws don’t stick.
Step 2: Make the Pastry
In a mixing bowl, rub the cold butter into the flour with your fingertips until the mixture looks like fine breadcrumbs. Stir in the grated cheddar, mustard powder, cayenne pepper, salt, and pepper until evenly combined.
Step 3: Bind the Dough
Add the beaten egg a little at a time, mixing until the dough just comes together into a firm, smooth ball. Avoid adding too much liquid the dough should hold together without feeling sticky or wet.
Step 4: Chill the Dough
Wrap the dough and chill it in the fridge for about 15-20 minutes. This makes it much easier to roll and helps the straws hold their shape during baking.
Step 5: Roll and Cut
On a lightly floured surface, roll the dough to roughly 6mm thickness. Using a sharp knife or pizza cutter, slice it into thin strips, about 1cm wide.
Step 6: Add the Topping
Brush each strip lightly with beaten egg, then sprinkle over the extra grated cheese for a golden, crispy finish.
Step 7: Bake
Arrange the strips on your prepared trays, leaving a little space between each one. Bake for 10-12 minutes, or until golden and crisp around the edges.
Step 8: Cool
Let the straws sit on the tray for a couple of minutes, then transfer to a wire rack to cool completely. This final cooling step is what gives them their signature snap.
What I Got Wrong (And How I Fixed It)
The first time I made these, I rushed almost every step and it showed.
My biggest mistake was skipping the chilling time. I figured a quick 5-minute rest was close enough, but the dough was too soft to roll properly and stuck to everything. The fix was simple: a full 15-20 minutes in the fridge made the dough firm, manageable, and far easier to cut into neat strips.
My second mistake was rolling the pastry too thin, thinking it would make the straws crisper. Instead, they baked up hard and almost cracker-like, with barely any of that light, flaky texture. Rolling to a slightly thicker, even 6mm gave a much better balance of crisp and tender.
Lastly, I underestimated how quickly they go from golden to overdone. A minute or two too long in the oven and the edges turned bitter. Setting a timer and checking at the 10-minute mark saved the next batch completely.
Healthier Version of Mary Berry Cheese Straws
If you’d like to lighten these up a little without losing the flavour, try these adjustments:
- Use reduced-fat cheddar: Cuts down on saturated fat while still delivering a sharp, cheesy taste.
- Swap half the butter for olive oil-based spread: Slightly reduces saturated fat content.
- Use wholemeal or half-wholemeal flour: Adds fibre and a nuttier flavour.
- Reduce added salt: Cheese already brings plenty of saltiness, so go light on extra seasoning.
- Bake smaller portions: Cutting thinner strips naturally reduces portion size per straw.
These swaps won’t drastically change the texture, but they do make this snack a little easier to enjoy guilt-free.
Ingredient Substitutions for Mary Berry Cheese Straws
Don’t have everything on hand? Here are some easy substitutions:
| Original Ingredient | Substitute | Notes |
| Cheddar cheese | Parmesan, Gruyère, or red Leicester | Changes flavour intensity slightly |
| Mustard powder | Dijon mustard (small amount) | Use sparingly to avoid excess moisture |
| Cayenne pepper | Smoked paprika or chilli flakes | Adjusts the heat level and flavour |
| Butter | Margarine or plant-based spread | Suitable for dairy-light versions |
| Plain flour | Gluten-free flour blend | Texture may be slightly more delicate |
| Egg wash | Milk or plant-based milk | Gives a slightly less golden finish |
Pairing Ideas: What to Serve With Mary Berry Cheese Straws
Cheese straws are wonderfully versatile and pair well with both drinks and dishes:
- Soups: Tomato, leek, or butternut squash soup are classic matches.
- Salads: A crunchy companion to a fresh green or chicken salad.
- Dips: Serve alongside hummus, soured cream dip, or chutney.
- Drinks: Great with a glass of wine, sparkling water, or festive punch.
- Cheese boards: A natural fit alongside crackers, grapes, and cured meats.
- Party platters: Mix with other nibbles like sausage rolls or mini quiches.
Expert Tips to Make Perfect Mary Berry Cheese Straws
A few small details can make a big difference in the final result:
- Keep everything cold – Cold butter and a chilled dough are key to a flaky texture.
- Grate cheese finely – It blends more evenly and melts smoothly into the dough.
- Don’t overwork the dough – Mix just until it comes together to avoid a tough texture.
- Cut evenly – Uniform strips bake at the same rate, so nothing burns while others are pale.
- Watch the oven closely – These bake quickly, so check a minute or two early.
- Cool completely before storing – This locks in that satisfying crunch.
Creative Ways to Customize Mary Berry Cheese Straws
Once you’ve nailed the basic recipe, try mixing things up:
- Herb-infused: Add chopped rosemary, thyme, or chives to the dough.
- Spicy kick: Increase the cayenne or add a dash of hot sauce powder.
- Seeded straws: Sprinkle sesame, poppy, or nigella seeds before baking.
- Cheese blend: Combine cheddar with Parmesan or a smoked cheese for depth.
- Sweet-savoury twist: A light drizzle of honey after baking adds an unexpected contrast.
- Twisted shapes: Instead of straight strips, twist each piece for a spiral look.
Storing Mary Berry Cheese Straws the Right Way
To keep your cheese straws crisp and tasty:
- Room temperature: Store in an airtight container for up to 3 days.
- Avoid the fridge: Refrigeration can make pastry go soft and lose its crunch.
- Layer with parchment: If stacking, separate layers with baking parchment to prevent sticking.
- Freezer storage: Freeze baked straws in a sealed container or bag for up to 1 month.
- Unbaked dough: Can also be frozen and sliced fresh before baking when needed.
How to Reheat Mary Berry Cheese Straws (If Needed)
While cheese straws are best enjoyed fresh or at room temperature, reheating can restore some crispness if they’ve gone slightly soft:
- Oven method: Warm at 160°C for 3-5 minutes on a baking tray.
- Avoid the microwave: It tends to make the pastry chewy rather than crisp.
- From frozen: Bake straight from frozen at 180°C for around 8-10 minutes until heated through and crisp again.
Nutritional Breakdown (per straw)
Approximate values based on a standard batch of around 20-24 straws:
| Nutrient | Approximate Amount |
| Calories | 80-95 kcal |
| Fat | 5-6g |
| Saturated Fat | 3g |
| Carbohydrates | 6-7g |
| Protein | 2-3g |
| Salt | 0.2-0.3g |
These figures will vary slightly depending on the type of cheese, pastry, and portion size used.
Mary Berry Cheese Straws
How long do Mary Berry cheese straws last?
Stored in an airtight container at room temperature, they stay fresh and crisp for up to 3 days.
Can I make the dough ahead of time?
Yes, the dough can be made a day in advance and kept chilled until you’re ready to roll and bake.
Can I freeze cheese straws?
Yes, both baked straws and unbaked dough freeze well for up to a month.
What’s the best cheese to use?
A mature cheddar gives the strongest flavour, though Parmesan adds a lovely depth when combined with cheddar.
Why did my cheese straws turn out soggy?
This usually happens if the dough wasn’t chilled enough or the straws weren’t baked until properly golden and crisp.
Can I use puff pastry instead of shortcrust?
Absolutely. Ready-rolled puff pastry is a quick shortcut that still produces light, flaky, cheesy results.
Conclusion
Mary Berry cheese straws are proof that a handful of simple ingredients can turn into something genuinely special. Crisp, buttery, and packed with cheesy flavour, they’re as easy to make for a quiet afternoon snack as they are for a full party spread. With a little attention to chilling the dough, cutting even strips, and keeping an eye on the oven, you’ll end up with a batch that snaps perfectly with every bite.
Once you’ve made these a few times, don’t be afraid to experiment a different cheese, a sprinkle of herbs, or a twist in shape can make the recipe your own. However you serve them, one thing’s for sure: they rarely last long once they’re out of the oven.