
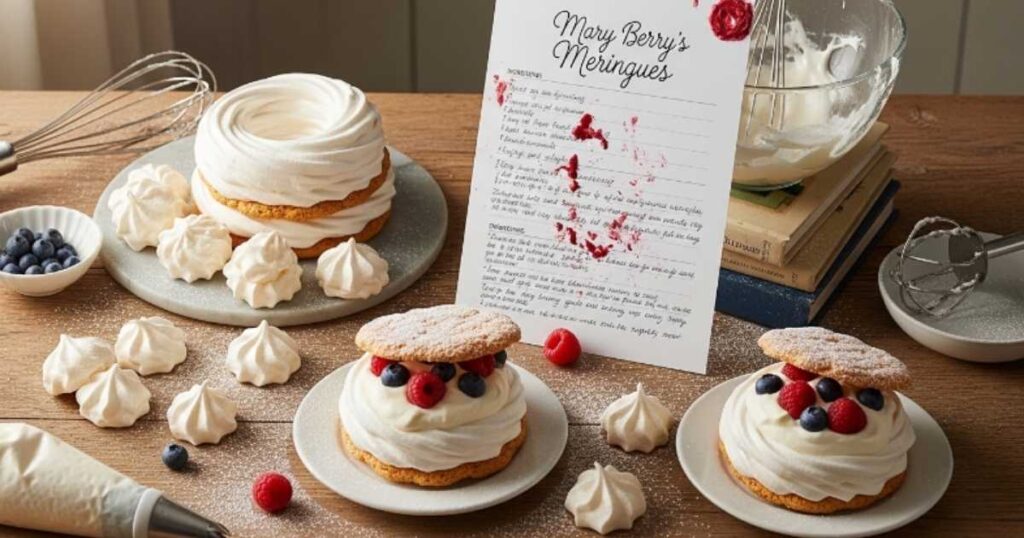
The Mary Berry Meringues Recipe is a classic British dessert. It uses just egg whites and sugar. Yet the results are truly stunning. Light, crisp, and melt-in-the-mouth every bite feels special. This recipe has been loved for generations. Mary Berry keeps it simple, and that’s exactly why it works so well. Anyone can make it at home.
The Mary Berry Meringues Recipe gives you a perfectly crisp shell with a soft, chewy center. You don’t need fancy skills or expensive tools. Just follow the steps and trust the process. Mary Berry Meringues are great for afternoon tea, dinner parties, or everyday treats. Serve them with cream and berries for a beautiful finish. This Mary Berry Meringues Recipe is one you’ll come back to again and again.
Related Post: Mary Berry Cheese Scones Recipe
What Are Mary Berry’s Meringues?
Mary Berry’s meringues are a traditional English dessert built on just two core ingredients: egg whites and sugar. When whipped to stiff, glossy peaks and baked low and slow, they transform into crisp meringue shells with a soft, marshmallowy center. It’s the kind of result that looks like it took hours of technical skill but actually comes together in well under two hours.
What sets Mary Berry’s approach apart is her attention to detail the gradual addition of sugar, the stabilizing touch of cornflour and vinegar, and the slow oven cooling that prevents cracking. These aren’t shortcuts or tricks. They’re the marks of a baker who truly understands her craft.
Why This Recipe Is Worth Trying
This Mary Berry Meringues Recipe is one of those rare bakes that’s both foolproof and impressive. With only four ingredients and a handful of steps, even a beginner can pull off bakery-quality results. The technique is straightforward, and once you understand the logic behind each step, it becomes second nature.
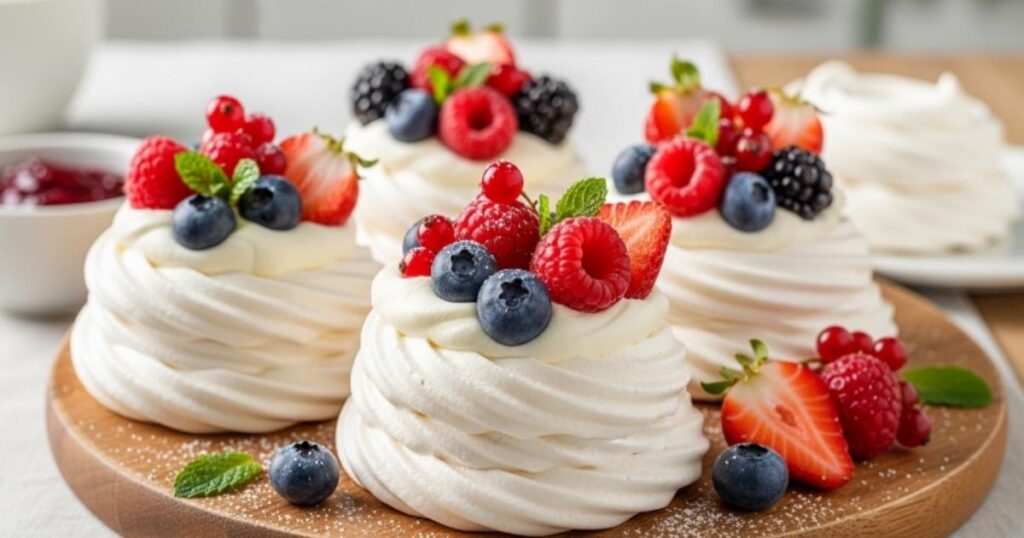
Beyond simplicity, these homemade meringues are incredibly versatile. Serve them on their own, pile them with cream and fresh berries, or crush them over ice cream for a quick dessert upgrade. They’re also a brilliant make-ahead option bake a batch at the weekend and you’ve got dessert sorted for days.
Essential Ingredients to Make Mary Berry Meringues
You don’t need a long shopping list for this recipe. Here’s what you’ll need:
| Ingredient | Amount | Notes |
| Egg whites | 4 large | Room temperature works best |
| Caster sugar | 225g | Fine granulated sugar if needed |
| Cornflour | ½ tsp | Optional adds chewiness |
| White vinegar or lemon juice | 1 tsp | Helps structure hold |
Room temperature egg whites whip up faster and hold more air than cold ones. Don’t skip this step it genuinely makes a difference. And always use caster sugar rather than coarse granulated; the finer crystals dissolve more easily and give you that signature glossy peak.
Handy Kitchen Tools for Best Results
Having the right equipment makes this bake much smoother. You don’t need anything fancy, but a few essentials really help:
- Electric hand mixer or stand mixer hand-whisking is exhausting and rarely achieves the right stiffness
- Clean glass or metal bowl plastic holds grease and will ruin your meringue
- Baking trays lined with parchment paper
- Spatula for folding in the stabilizers
- Piping bag (optional) if you want neat, professional shapes
The most important tool here is actually a clean bowl. Even a tiny trace of grease prevents the egg whites from whipping properly. Wipe the bowl with a little lemon juice or white vinegar before you start.
Step-by-Step Guide to Making Mary Berry Meringues
Step 1: Preheat the Oven and Prepare the Trays
Set your oven to 140°C (120°C fan) / 275°F. Line two baking trays with parchment paper and set them aside. Low-temperature baking is what gives meringues that delicate crispness without browning.
Step 2: Whisk the Egg Whites
Add your egg whites to the clean bowl and whisk on medium speed. You’re looking for soft peaks at this stage the mixture holds its shape but still looks glossy, not dry or lumpy. Don’t rush to high speed too quickly or the structure becomes unstable.
Step 3: Add Sugar Gradually
With the mixer still running, add the caster sugar one tablespoon at a time. This slow addition is the key to smooth, glossy meringue. Rushing this step causes a grainy texture. Keep whisking until you get thick, stiff peaks this usually takes around 5 to 7 minutes. To test, rub a little mixture between your fingers. If it feels gritty, the sugar hasn’t fully dissolved yet, so keep whisking.
Step 4: Stabilize the Meringue
Once you’ve got those beautiful stiff peaks, gently fold in the cornflour and vinegar (or lemon juice) using a spatula. Don’t stir fold. These two ingredients help create that chewy meringue center and prevent the shells from weeping or collapsing after baking.
Step 5: Shape the Meringues
Spoon or pipe the mixture onto your prepared trays, leaving a little space between each one. You can make rustic swirls, small nests, or neat rounds it’s entirely up to you. Meringue nests are great for individual desserts. Rustic swirls have their own charm and require zero piping skill.
Step 6: Bake Slowly
Bake for 1 hour. The meringues are done when they lift cleanly off the parchment and feel dry to the touch. Once the hour is up, turn the oven off but leave the meringues inside to cool completely. This gradual cooling is what prevents cracks from forming.
Step 7: Serve or Store
Once fully cooled, serve them as they are or dress them up with whipped cream and fresh fruit. For storing, transfer to an airtight container and keep them at room temperature for up to a week.
What I Got Wrong (And How I Fixed It)
Learning to make this Mary Berry Meringues Recipe came with a few hiccups along the way and if you’re a first-timer, these lessons might save you some frustration.
My first batch cracked badly. It turned out I’d opened the oven too soon and let cold air rush in. Leaving the meringues in the switched-off oven to cool gradually fixed that completely. I also had a batch turn out grainy because I added all the sugar at once. Patience really is the key here one spoonful at a time and the texture becomes smooth and glassy.
Sticky shells stumped me for a while too. Humidity in the kitchen was the culprit. If it’s a rainy day, bake them a little longer or crank the air conditioning if you have it. And if your meringue isn’t holding shape when you pipe it, you simply haven’t whisked long enough. Keep going until you get firm, stiff peaks that don’t droop when the whisk is lifted.
Healthier Version of Mary Berry’s Meringues
Meringues are naturally fat-free and gluten-free, which already puts them ahead of most desserts. But if you want to lighten them further, there are a few easy swaps.
Reduce the sugar to around 175g for a slightly less sweet result the meringue will still set, though it may be a touch less crisp. Pair the finished meringues with Greek yogurt and sliced fruit instead of whipped double cream. You’ll cut the fat significantly while keeping all the elegance. For portion control, make bite-sized mini meringues rather than large nests they bake faster and are easier to share.
Ingredient Substitutions for Mary Berry Meringues
This recipe is forgiving when it comes to substitutions:
| Original | Substitute | Notes |
| Caster sugar | Fine granulated sugar | Coarse sugar won’t dissolve well |
| Cornflour | Arrowroot powder | Works in the same ratio |
| White vinegar | Lemon juice or cream of tartar | All achieve the same structure |
| Egg whites | Aquafaba (chickpea brine) | Works for vegan meringues |
Aquafaba is genuinely impressive as a vegan meringue base about 3 tablespoons replaces one egg white. It won’t taste exactly the same, but it whips up beautifully and bakes into a surprisingly convincing crisp shell.
Pairing Ideas: What to Serve With Mary Berry Meringues
One of the best things about these light airy desserts is how well they pair with so many flavours.
Classic combinations are classic for a reason softly whipped cream and a handful of fresh strawberries or raspberries is hard to beat. But don’t overlook lemon curd. Its tartness cuts through the sweetness brilliantly. For something more indulgent, drizzle with dark chocolate ganache or serve crumbled over a scoop of vanilla ice cream. If you want to go seasonal, mango, kiwi, and passionfruit all pair beautifully with the neutral sweetness of a well-made meringue.
Expert Tips to Make Perfect Mary Berry Meringues
These tips are the difference between good and great:
- Clean equipment is non-negotiable. Wipe everything down with lemon juice or vinegar before you start.
- Separate eggs carefully. Even a tiny drop of yolk will prevent the whites from whipping.
- Add sugar slowly. This single step has the biggest impact on texture.
- Avoid humid conditions. Meringues absorb moisture from the air and lose their crispness.
- Cool in the oven. Always. This prevents cracking and finishes the drying process.
- Test before removing. They should lift cleanly off the parchment and feel completely dry.
Creative Ways to Customize Mary Berry Meringues
Once you’ve mastered the basic Mary Berry Meringues Recipe, the door opens to some really fun variations.
Swirl melted dark chocolate through the mixture before baking for a dramatic marbled effect. Fold in a teaspoon of raspberry or strawberry powder for natural color and a fruity depth of flavor. Sprinkle chopped pistachios or toasted almonds on top before the meringues go in the oven. For a festive version, add a drop of peppermint extract and a light dusting of cocoa. Sandwich two meringues together with chocolate ganache or flavored cream for an elegant little dessert that looks straight out of a patisserie.
Storing Mary Berry Meringues the Right Way
Keep unfilled meringues in an airtight container at room temperature for up to 7 days. Avoid the fridge for plain meringues the moisture will make them sticky and soft. If you’ve filled them with cream, refrigerate and eat within 24 hours. Unfilled meringues freeze surprisingly well just place them in a single layer in an airtight box and freeze for up to a month. Thaw at room temperature for about 30 minutes before serving.
How to Reheat Mary Berry Meringues (If Needed)
Most of the time, you don’t need to reheat meringues. But if they’ve lost their crispness, there’s a simple fix.
Place them in an oven set to 120°C (250°F) for about 10 minutes. This gently draws out any moisture they’ve absorbed and restores that satisfying crunch. Never use a microwave it turns them soft and sticky almost instantly. If you’re working from frozen, let them thaw completely at room temperature first, then refresh in the oven if needed.
Nutritional Breakdown (per meringue)
| Nutrient | Amount |
| Calories | ~100 kcal |
| Protein | 2g |
| Carbohydrates | 22g |
| Sugars | 21g |
| Fat | 0g |
| Fibre | 0g |
These are naturally gluten-free and fat-free, making them one of the lighter dessert options out there especially if you skip the cream and go with fresh fruit instead.
Mary Berry Meringues
Prep Time: 15 minutes | Cook Time: 60 minutes | Total Time: 1 hour 15 minutes Yield: 10 meringues | Category: Dessert | Cuisine: British
Ingredients
- 4 large egg whites (room temperature)
- 225g caster sugar
- ½ tsp cornflour (optional)
- 1 tsp white vinegar or lemon juice
Optional toppings: whipped cream, fresh berries, chocolate drizzle, or lemon curd
Instructions
- Preheat oven to 140°C (120°C fan / 275°F). Line two baking trays with parchment.
- Whisk egg whites on medium speed until soft peaks form.
- Add sugar one tablespoon at a time, whisking until thick, glossy, and stiff (5–7 minutes).
- Fold in cornflour and vinegar gently with a spatula.
- Spoon or pipe onto lined trays, leaving space between each.
- Bake for 1 hour. Turn off oven and cool inside completely.
- Serve plain or with your chosen toppings.
Did You Make This Recipe?
Share a photo and tag us we’d love to see how yours turned out!
Conclusion
The Mary Berry Meringues Recipe is a true testament to how extraordinary results can come from the simplest ingredients. With just egg whites, sugar, and a bit of technique, you get a dessert that’s elegant enough for a dinner party and easy enough for a Tuesday afternoon. Once you understand the why behind each step slow sugar addition, low heat, gradual cooling you’ll nail it every time.
Whether you serve them with cream and berries, turn them into pavlova bases, or dress them up with chocolate and nuts, these classic meringue shells never disappoint. Give them a try, trust the process, and enjoy one of British baking’s most beloved treats.